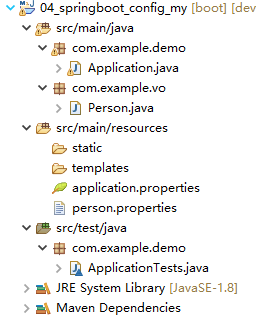
1. @PropertySource
1.1 为使用要使用@PropertySource
项目配置的注入,所有的配置都是写在appliaction.properties或application.yml文件里,那么如果不想写在这里面怎么处理呢使用@PropertySource可以解决
仅验证可以使用.properties配置文件,未验证.yml配置文件

1
2
3
4
5
6
7
8
9
10
11
12
13
14
15
16
17
18
19
20
21
22
23
24
25
26
27
28
29
30
31
| package com.example.vo;
import java.util.Date;
import java.util.List;
import java.util.Map;
import java.util.Set;
import org.springframework.boot.context.properties.ConfigurationProperties;
import org.springframework.context.annotation.PropertySource;
import org.springframework.stereotype.Component;
import org.springframework.validation.annotation.Validated;
import lombok.Data;
@Component
@ConfigurationProperties(prefix = "person")
@Data
@Validated
@PropertySource("classpath:person.properties")
public class Person {
private Integer id;
private String userName;
private Integer age;
private String[] hobby;
private List<String> course;
private Set<String> book;
private Map<String, String> score;
private Date birthday;
}
|
person.properties:
1
2
3
4
5
6
7
8
9
10
11
12
13
14
| server.port=8890
person.id=2
person.user-name=xiaozhang
person.age=${random.int(1,100)}
person.hobby=reading,exercise,writing
person.course=literature,mathematics,geography,chemistry,${course}
person.book=book1,book2,book3,${person.id}
person.score.math=90
person.score.chemistry=95
person.birthday.time=1610890991736
course: biology
|
1
2
3
4
5
6
7
8
9
10
11
12
13
14
15
16
17
18
19
20
| package com.example.demo;
import org.junit.jupiter.api.Test;
import org.springframework.beans.factory.annotation.Autowired;
import org.springframework.boot.test.context.SpringBootTest;
import com.example.vo.Person;
@SpringBootTest
class ApplicationTests {
@Autowired
private Person person;
@Test
void contextLoads() {
System.out.println(person);
}
}
|
(1) @PropertySource只要使用在能扫描到的地方就可以,例如: Application.java
1
2
3
4
5
6
7
8
9
10
11
12
13
14
15
16
17
| package com.example.demo;
import org.springframework.boot.SpringApplication;
import org.springframework.boot.autoconfigure.SpringBootApplication;
import org.springframework.context.annotation.ComponentScan;
import org.springframework.context.annotation.PropertySource;
@SpringBootApplication
@ComponentScan("com.example")
@PropertySource("classpath:person.properties")
public class Application {
public static void main(String[] args) {
SpringApplication.run(Application.class, args);
}
}
|
1.2 注入优先级的问题
所在的配置都是优先注入appliaction.properties或application.yml里面的数据,自己创建的配置文件properties优先级较低
如果要不一样,必须修改配置文件引入的前缀
1
2
3
4
5
6
7
8
9
10
11
12
13
14
| server.port=8890
person.id=100
person.user-name=xiaozhang
person.age=${random.int(1,100)}
person.hobby=reading,exercise,writing
person.course=literature,mathematics,geography,chemistry,${course}
person.book=book1,book2,book3,${person.id}
person.score.math=90
person.score.chemistry=98
person.birthday.time=1610890991736
course: biology
|
ApplicationTests的输出:
1
| Person(id=100, userName=xiaozhang, age=94, hobby=[reading, exercise, writing], course=[literature, mathematics, geography, chemistry, biology], book=[book1, book2, book3, 100], score={math=90, chemistry=98}, birthday=Sun Jan 17 21:43:11 CST 2021)
|
2.@ImportResource
2.1 为什么要使用@ImportResource
从上面所有的配置中可以看出我们没有使用以前的spring的xml的配置方法,如果还是要使用spring里面的xml的配置方式怎么办,使用@ImportResource
创建Student.java,没有加@Component注解
1
2
3
4
5
6
7
8
9
10
11
12
13
14
| package com.example.vo;
import lombok.AllArgsConstructor;
import lombok.Data;
import lombok.NoArgsConstructor;
@Data
@AllArgsConstructor
@NoArgsConstructor
public class Student {
private Integer id;
private String name;
private Integer age;
}
|
创建beans.xml
1
2
3
4
5
6
7
8
9
10
11
12
| <?xml version="1.0" encoding="UTF-8"?>
<beans xmlns="http://www.springframework.org/schema/beans"
xmlns:xsi="http://www.w3.org/2001/XMLSchema-instance"
xsi:schemaLocation="http://www.springframework.org/schema/beans http://www.springframework.org/schema/beans/spring-beans.xsd">
<bean id="student" class="com.example.vo.Student">
<property name="id" value="1"></property>
<property name="name" value="Steven"></property>
</bean>
</beans>
|
启动类Application.java,添加@ImportResource注解,添加在能被Spring扫描到的类上就可以
1
2
3
4
5
6
7
8
9
10
11
12
13
14
15
16
17
18
19
| package com.example.demo;
import org.springframework.boot.SpringApplication;
import org.springframework.boot.autoconfigure.SpringBootApplication;
import org.springframework.context.annotation.ComponentScan;
import org.springframework.context.annotation.ImportResource;
import org.springframework.context.annotation.PropertySource;
@SpringBootApplication
@ComponentScan("com.example")
@ImportResource(value = {"classpath:beans.xml"})
public class Application {
public static void main(String[] args) {
SpringApplication.run(Application.class, args);
}
}
|
测试类ApplicationTests
1
2
3
4
5
6
7
8
9
10
11
12
13
14
15
16
17
18
19
20
| package com.example.demo;
import org.junit.jupiter.api.Test;
import org.springframework.beans.factory.annotation.Autowired;
import org.springframework.boot.test.context.SpringBootTest;
import com.example.vo.Person;
import com.example.vo.Student;
@SpringBootTest
class ApplicationTests {
@Autowired
private Student student;
@Test
void contextLoads() {
System.out.println(student);
}
}
|
<bean id="student">和private Student student,id值和属性名可以不相等
3.@Bean
创建Teacher.java
1
2
3
4
5
6
7
8
9
10
11
12
13
14
15
16
| package com.example.vo;
import lombok.AllArgsConstructor;
import lombok.Data;
import lombok.NoArgsConstructor;
@Data
@NoArgsConstructor
@AllArgsConstructor
public class Teacher {
private Integer id;
private String name;
private String subject;
}
|
创建TeacherConfig.java
1
2
3
4
5
6
7
8
9
10
11
12
13
14
15
16
17
18
19
20
21
22
23
24
25
26
27
28
29
30
31
32
33
34
35
36
37
38
39
| package com.example.config;
import org.springframework.context.annotation.Bean;
import org.springframework.context.annotation.Configuration;
import com.example.vo.Teacher;
@Configuration
public class TeacherConfig {
@Bean("teacher1")
public Teacher getTeacher1() {
return new Teacher(1, "Tom", "physics");
}
@Bean("teacher2")
public Teacher getTeacher2() {
return new Teacher(2, "Jerry", "chemistry");
}
@Bean("teacher3")
public Teacher getTeacher3(Teacher teacher2) {
teacher2.setSubject("math");
return teacher2;
}
}
|
ApplicationTests.java
1
2
3
4
5
6
7
8
9
10
11
12
13
14
15
16
17
18
19
20
21
22
23
24
25
26
27
28
29
30
31
| package com.example.demo;
import org.junit.jupiter.api.Test;
import org.springframework.beans.factory.annotation.Autowired;
import org.springframework.beans.factory.annotation.Qualifier;
import org.springframework.boot.test.context.SpringBootTest;
import com.example.vo.Teacher;
@SpringBootTest
class ApplicationTests {
@Autowired
@Qualifier("teacher1")
private Teacher teacher;
@Autowired
private Teacher teacher1;
@Test
void contextLoads() {
System.out.println(teacher);
System.out.println(teacher1);
System.out.println(teacher3);
}
}
|
