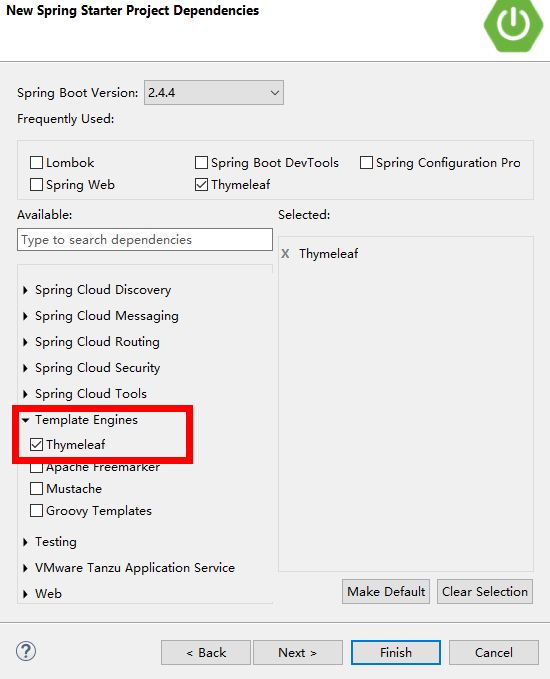
Thymeleaf模板的使用
1.概述
简单说,Thymeleaf是一个跟Velocity、FreeMarker类似的模板引擎,它可以完全替代JSP。相较与其他的模板引擎,它有如下三个极吸引人的特点:
1.Thymeleaf在有网络和无网络的环境下皆可运行,即它可以让美工在浏览器查看页面的静态效果,也可以让程序员在服务器查看带数据的动态页面效果。这是由于它支持html原型,然后在html标签里增加额外的属性来达到模板+数据的展示方式。浏览器解释html时会忽略未定义的标签属性,所以thymeleaf的模板可以静态地运行;当有数据返回到页面时,Thymeleaf标签会动态地替换掉静态内容,使页面动态显示。
2.Thymeleaf开箱即用的特性。它提供标准和spring标准两种方言,可以直接套用模板实现JSTL、OGNL表达式效果,避免每天套模板、改jstl、改标签的困扰。同时开发人员也可以扩展和创建自定义的方言。
3.Thymeleaf提供spring标准方言和一个与SpringMVC完美集成的可选模块,可以快速的实现表单绑定、属性编辑器、国际化等功能。
2.Springboot对thymeleaf支持
找到自配置的包
Maven Dependencies -> spring-boot-autoconfiguration -> org.springframework.boot.autoconfigure -> thymeleaf
ThymeleafAutoConfiguration.class
1
2
3
4
5
6
7
8
9
| package org.springframework.boot.autoconfigure.thymeleaf;
@Configuration(proxyBeanMethods = false)
@EnableConfigurationProperties(ThymeleafProperties.class)
@ConditionalOnClass({ TemplateMode.class, SpringTemplateEngine.class })
@AutoConfigureAfter({ WebMvcAutoConfiguration.class, WebFluxAutoConfiguration.class })
public class ThymeleafAutoConfiguration {
}
|
ThymeleafProperties.class
1
2
3
4
5
6
7
8
9
10
11
12
13
14
15
16
17
18
19
20
21
22
23
24
25
26
27
28
29
30
31
32
33
34
35
36
37
38
39
40
41
42
| package org.springframework.boot.autoconfigure.thymeleaf;
@ConfigurationProperties(prefix = "spring.thymeleaf")
public class ThymeleafProperties {
private static final Charset DEFAULT_ENCODING = StandardCharsets.UTF_8;
public static final String DEFAULT_PREFIX = "classpath:/templates/";
public static final String DEFAULT_SUFFIX = ".html";
private String prefix = DEFAULT_PREFIX;
private String suffix = DEFAULT_SUFFIX;
private String mode = "HTML";
private Charset encoding = DEFAULT_ENCODING;
private boolean cache = true;
}
|
3.Thymeleaf 必须通过Controller跳转 不能直接访问
创建项目,加入Thymeleaf依赖
1
2
3
4
| <dependency>
<groupId>org.springframework.boot</groupId>
<artifactId>spring-boot-starter-thymeleaf</artifactId>
</dependency>
|
创建Controller
1
2
3
4
5
6
7
8
9
10
11
12
13
14
| package com.example.demo.controller;
import org.springframework.stereotype.Controller;
import org.springframework.web.bind.annotation.RequestMapping;
@Controller
@RequestMapping(value = "index")
public class IndexController {
@RequestMapping("helloWorld")
public String helloWorld() {
return "helloWorld";
}
}
|
在src/main/resources/templates目录下创建html
1
2
3
4
5
6
7
8
9
10
| <!DOCTYPE html>
<html>
<head>
<meta charset="UTF-8">
<title>Insert title here</title>
</head>
<body>
templates/helloWorld.html
</body>
</html>
|
在浏览器中访问

4.相关语法
(1)简单表达式
1
2
3
4
| 1.变量的表达式:${...}
2.选择变量表达式:*{...}
3.信息表达式:#{...}
4.链接URL表达式:@{...}, <a href="user/query.action">, <a th:href="@{user/query.action}">
|
(2)字面值th:text
1
2
3
4
5
| 1.文本文字:'one text', 'Another one!',…
2.文字数量:0, 34, 3.0, 12.3,…
3.布尔型常量:true, false
4.空的文字:null
5.文字标记:one, sometext, main,…
|
(3)文本处理
1
2
| 1.字符串并置:+
2.文字替换:|The name is ${name}|
|
(4)表达式基本对象
1
2
3
4
5
6
7
| 1.#ctx:上下文对象
2.#vars:上下文变量
3.#locale:上下文语言环境
4.#httpServletRequest:(只有在Web上下文)HttpServletRequest对象
5.#httpSession:(只有在Web上下文)HttpSession对象。
用法:<span th:text="${#locale.country}">US</span>.
|
(5)实用工具对象
1
2
3
4
5
6
7
8
9
10
11
12
13
| 1.#dates: java.util的实用方法。对象:日期格式、组件提取等.
2.#calendars:类似于#日期,但对于java.util。日历对象
3.#numbers:格式化数字对象的实用方法。
4.#strings:字符串对象的实用方法:包含startsWith,将/附加等。
5.#objects:实用方法的对象。
6.#bools:布尔评价的实用方法。
7.#arrays:数组的实用方法。
8.#lists:list集合。
9.#sets:set集合。
10.#maps:map集合。
11.#aggregates:实用程序方法用于创建聚集在数组或集合.
12.#messages:实用程序方法获取外部信息内部变量表达式,以同样的方式,因为它们将获得使用# {…}语法
13.#ids:实用程序方法来处理可能重复的id属性(例如,由于迭代)。
|
5.Thymeleaf代码提示功能
在Eclipse中安装Thymeleaf插件即可。
Help -> Eclipse Marketplace...
或者
Help -> Install New Software
插件地址: http://www.thymeleaf.org/eclipse-plugin-update-site/
安装完成之后,重启Eclipse。
在html中添加
1
| <html xmlns:th="http://www.thymeleaf.org">
|
右键项目 -> Thymeleaf -> Add Thymeleaf Nature
6.#信息源表达式[国际化 I18N]
同一个软件,可以切换不同的语言
1.引入layui,https://www.layui.com/
将layui资源放入src/main/resources/static/路径下

2.controller中添加方法
1
2
3
4
5
6
7
8
9
10
11
12
13
14
15
| package com.example.demo.controller;
import org.springframework.stereotype.Controller;
import org.springframework.web.bind.annotation.RequestMapping;
@Controller
@RequestMapping(value = "index")
public class IndexController {
@RequestMapping(value = "showOneStudentInfo")
public String showOneStudentInfo() {
return "showOneStudentInfo";
}
}
|
3.创建showOneStudentInfo.html,src/main/resources/templates/showOneStudentInfo.html
1
2
3
4
5
6
7
8
9
10
11
12
13
14
15
16
17
18
19
20
21
22
23
24
25
26
27
28
29
30
31
32
33
34
35
36
37
38
39
40
41
42
43
44
45
46
47
48
49
50
51
52
| <!DOCTYPE html>
<html xmlns:th="http://www.thymeleaf.org">
<head>
<meta charset="UTF-8">
<title>Insert title here</title>
<link href="/layui/css/layui.css" rel="stylesheet" media="all" />
</head>
<body>
<fieldset class="layui-elem-field layui-field-title"
style="margin-top: 20px;">
<legend>学生信息</legend>
</fieldset>
<div class="layui-bg-gray" style="padding: 30px;">
<div class="layui-row layui-col-space15">
<div class="layui-col-md6">
<div class="layui-card">
<div class="layui-card-header" th:text="#{page.title}">卡片面板</div>
<div class="layui-card-body">
<span>学号:</span>
<span th:text="#{student.id}"></span>
</div>
<div class="layui-card-body">
<span>姓名:</span>
<span th:text="#{student.name}"></span>
</div>
<div class="layui-card-body">
<span>年龄:</span>
<span th:text="#{student.age}"></span>
</div>
<div class="layui-card-body">
<span>性别:</span>
<span th:text="#{student.gender}"></span>
</div>
<div class="layui-card-body">
<span>生日:</span>
<span th:text="#{student.birthday}"></span>
</div>
<div class="layui-card-body">
<span>电话:</span>
<span th:text="#{student.phone}"></span>
</div>
</div>
</div>
</div>
</div>
</body>
<script src="/layui/layui.js" type="text/javascript" charset="utf-8" ></script>
</html>
|
4.创建student.properties,src/main/resources/config/student.properties
1
2
3
4
5
6
7
8
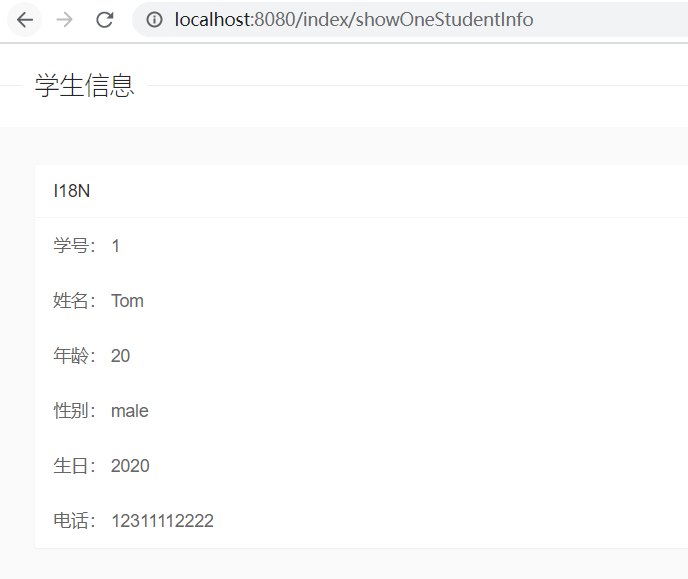
| page.title=I18N
student.id=1
student.name=Tom
student.age=20
student.gender=male
student.birthday=2020
student.phone=12311112222
|
5.浏览器访问http://localhost:8080/index/showOneStudentInfo
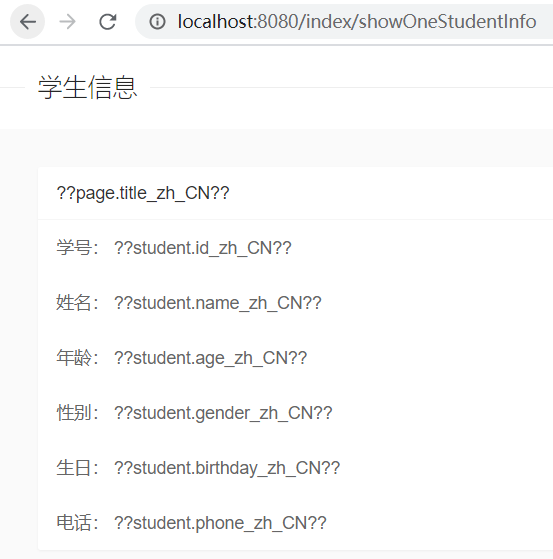
产生原因:因为本地没有相关的语言包 虽然有stduent.properties但是springboot不知道
6.创建配置类解决上面的问题
1
2
3
4
5
6
7
8
9
10
11
12
13
14
15
16
17
18
19
20
21
22
23
24
| package com.example.demo.config;
import org.springframework.context.annotation.Bean;
import org.springframework.context.annotation.Configuration;
import org.springframework.context.support.ResourceBundleMessageSource;
@Configuration
public class I18NConfig {
@Bean
public ResourceBundleMessageSource messageSource() {
ResourceBundleMessageSource messageSource = new ResourceBundleMessageSource();
messageSource.setUseCodeAsDefaultMessage(true);
messageSource.setFallbackToSystemLocale(false);
messageSource.setBasename("config/student");
messageSource.setDefaultEncoding("UTF-8");
messageSource.setCacheSeconds(2);
return messageSource;
}
}
|
浏览器中访问http://localhost:8080/index/showOneStudentInfo
7.创建student_zh_CN.properties,src/main/resources/config/student_zh_CN.properties
1
2
3
4
5
6
7
8
| page.title=I18N
student.id=2
student.name=\u5C0F\u660E
student.age=20
student.gender=\u7537
student.birthday=2020
student.phone=12311112222
|
浏览器中访问http://localhost:8080/index/showOneStudentInfo
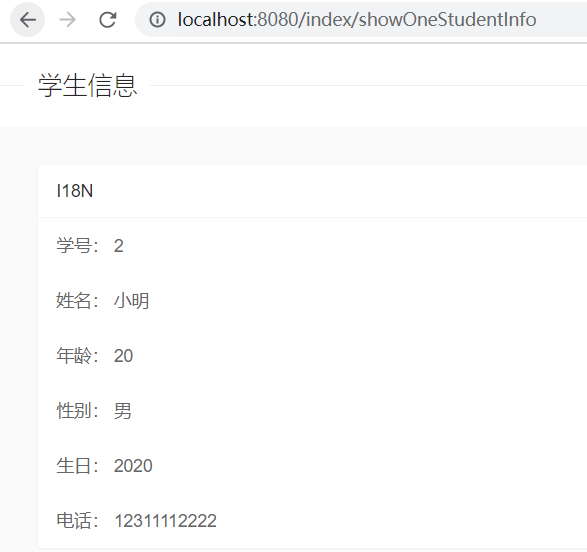
优先加载student_zh_CN.properties
7.@连接表达式
1.在controller中添加方法。
1
2
3
4
5
6
7
8
9
10
11
12
13
14
| package com.example.demo.controller;
import org.springframework.stereotype.Controller;
import org.springframework.web.bind.annotation.RequestMapping;
@Controller
@RequestMapping(value = "index")
public class IndexController {
@RequestMapping(value = "showLinkExpression")
public String showLinkExpression() {
return "showLinkExpression";
}
}
|
2.新建showLinkExpression.html,src/main/resources/templates/showLinkExpression.html
1
2
3
4
5
6
7
8
9
10
11
12
13
14
15
16
17
18
19
20
21
22
23
24
25
26
27
28
29
30
31
32
33
34
35
36
37
38
39
40
41
42
43
44
45
46
47
48
49
50
51
52
53
54
| <!DOCTYPE html>
<html xmlns:th="http://www.thymeleaf.org">
<head>
<meta charset="UTF-8">
<title>Insert title here</title>
<link th:href="@{/layui/css/layui.css}" rel="stylesheet" media="all">
</head>
<body>
<img alt="landscape" th:src="@{/images/landscape.jpg}">
<form action="@{/student/addStudent}"></form>
<fieldset class="layui-elem-field layui-field-title"
style="margin-top: 20px;">
<legend>学生信息</legend>
</fieldset>
<div class="layui-bg-gray" style="padding: 30px;">
<div class="layui-row layui-col-space15">
<div class="layui-col-md6">
<div class="layui-card">
<div class="layui-card-header" th:text="#{page.title}">卡片面板</div>
<div class="layui-card-body">
<span>学号:</span>
<span th:text="#{student.id}"></span>
</div>
<div class="layui-card-body">
<span>姓名:</span>
<span th:text="#{student.name}"></span>
</div>
<div class="layui-card-body">
<span>年龄:</span>
<span th:text="#{student.age}"></span>
</div>
<div class="layui-card-body">
<span>性别:</span>
<span th:text="#{student.gender}"></span>
</div>
<div class="layui-card-body">
<span>生日:</span>
<span th:text="#{student.birthday}"></span>
</div>
<div class="layui-card-body">
<span>电话:</span>
<span th:text="#{student.phone}"></span>
</div>
</div>
</div>
</div>
</div>
</body>
<script th:src="@{/layui/layui.js}" type="text/javascript" charset="utf-8"></script>
</html>
|
8.$表达式读取Model里面的对象
1.创建Student类
1
2
3
4
5
6
7
8
9
10
11
12
13
14
15
16
17
18
19
20
21
22
23
24
| package com.example.demo.vo;
import java.util.Date;
import lombok.AllArgsConstructor;
import lombok.Data;
import lombok.NoArgsConstructor;
@Data
@AllArgsConstructor
@NoArgsConstructor
public class Student {
private Integer id;
private String name;
private String gender;
private Integer age;
private Date birthday;
private String phone;
private Date today;
private double score;
}
|
2.controller中添加方法
1
2
3
4
5
6
7
8
9
10
11
12
13
14
15
16
17
18
19
20
21
22
23
24
25
26
27
28
29
30
31
32
| package com.example.demo.controller;
import java.util.Date;
import org.springframework.stereotype.Controller;
import org.springframework.ui.Model;
import org.springframework.web.bind.annotation.RequestMapping;
import com.example.demo.vo.Student;
@Controller
@RequestMapping(value = "index")
public class IndexController {
@RequestMapping(value = "showOneStudentInfoByModel")
public String showOneStudentInfoByModel(Model model) {
Student student = new Student();
student.setId(50);
student.setName("Tom");
student.setGender("male");
student.setAge(15);
student.setBirthday(new Date());
student.setPhone("11122223333");
student.setToday(new Date());
student.setScore(95.675);
model.addAttribute("student", student);
return "showOneStudentInfoByModel";
}
}
|
3.创建showOneStudentInfoByModel.html,src/main/resources/templates/showOneStudentInfoByModel.html
1
2
3
4
5
6
7
8
9
10
11
12
13
14
15
16
17
18
19
20
21
22
23
24
25
26
27
28
29
30
31
32
33
34
35
36
37
38
39
40
41
42
43
44
45
46
47
48
49
50
51
52
| <!DOCTYPE html>
<html xmlns:th="http://www.thymeleaf.org">
<head>
<meta charset="UTF-8">
<title>Insert title here</title>
<link th:href="@{/layui/css/layui.css}" rel="stylesheet" media="all">
</head>
<body>
<fieldset class="layui-elem-field layui-field-title"
style="margin-top: 20px;">
<legend>学生信息</legend>
</fieldset>
<div class="layui-bg-gray" style="padding: 30px;">
<div class="layui-row layui-col-space15">
<div class="layui-col-md6">
<div class="layui-card">
<div class="layui-card-header" th:text="#{page.title}">卡片面板</div>
<div class="layui-card-body">
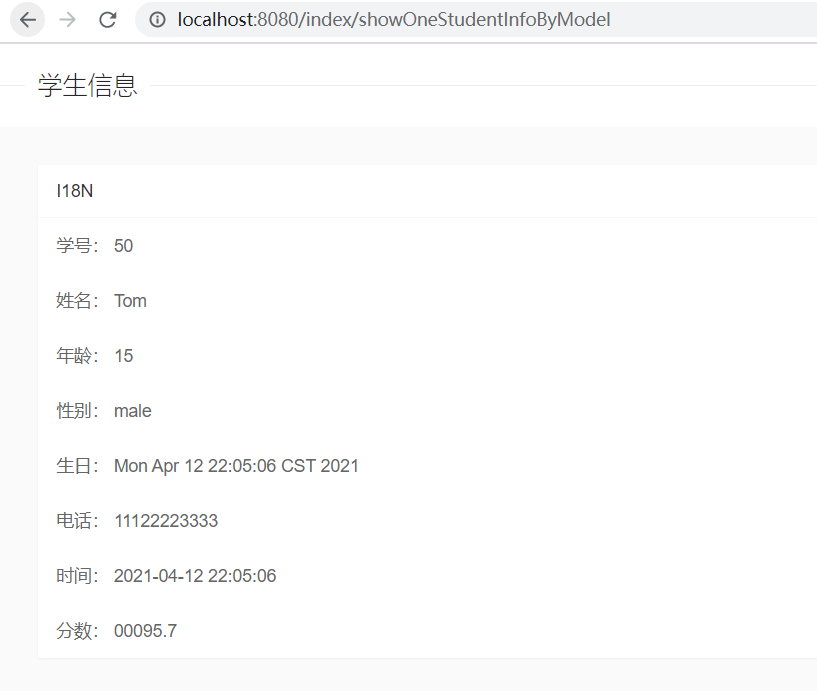
<span>学号:</span> <span th:text="${student.id}"></span>
</div>
<div class="layui-card-body">
<span>姓名:</span> <span th:text="${student.name}"></span>
</div>
<div class="layui-card-body">
<span>年龄:</span> <span th:text="${student.age}"></span>
</div>
<div class="layui-card-body">
<span>性别:</span> <span th:text="${student.gender}"></span>
</div>
<div class="layui-card-body">
<span>生日:</span> <span th:text="${student.birthday}"></span>
</div>
<div class="layui-card-body">
<span>电话:</span> <span th:text="${student.phone}"></span>
</div>
<div class="layui-card-body">
<span>时间:</span> <span th:text="${#dates.format(student.today, 'yyyy-MM-dd HH:mm:ss')}"></span>
</div>
<div class="layui-card-body">
<span>分数:</span> <span th:text="${#numbers.formatDecimal(student.score, 5, 1)}"></span>
</div>
</div>
</div>
</div>
</div>
</body>
<script th:src="@{/layui/layui.js}" type="text/javascript"
charset="utf-8"></script>
</html>
|
4.在浏览器中访问http://localhost:8080/index/showOneStudentInfoByModel
9.$表达式读取Model里面的集合
1.在controller添加方法
1
2
3
4
5
6
7
8
9
10
11
12
13
14
15
16
17
18
19
20
21
22
23
24
25
26
27
| package com.example.demo.controller;
import java.util.ArrayList;
import java.util.Date;
import org.springframework.stereotype.Controller;
import org.springframework.ui.Model;
import org.springframework.web.bind.annotation.RequestMapping;
import com.example.demo.vo.Student;
@Controller
@RequestMapping(value = "index")
public class IndexController {
@RequestMapping(value = "showStudentListInfoByModel")
public String showStudentListInfoByModel(Model model) {
ArrayList<Student> studentList = new ArrayList<>();
for (int i = 0; i < 6; i++) {
Student student = new Student((i+1), "name"+i, (i%2==0)?"male":"female", 20+i, new Date(), "11122223333", new Date(), 90+i);
studentList.add(student);
}
model.addAttribute("studentList", studentList);
return "showStudentListInfoByModel";
}
}
|
2.创建showStudentListInfoByModel.html,src/main/resources/templates/showStudentListInfoByModel.html
1
2
3
4
5
6
7
8
9
10
11
12
13
14
15
16
17
18
19
20
21
22
23
24
25
26
27
28
29
30
31
32
33
34
35
36
37
38
39
40
41
42
43
44
45
46
47
48
49
50
51
52
| <!DOCTYPE html>
<html xmlns:th="http://www.thymeleaf.org">
<head>
<meta charset="UTF-8">
<title>Insert title here</title>
<link th:href="@{/layui/css/layui.css}" rel="stylesheet" media="all">
</head>
<body>
<fieldset class="layui-elem-field layui-field-title"
style="margin-top: 20px;">
<legend>学生信息</legend>
</fieldset>
<div class="layui-bg-gray" style="padding: 30px;">
<div class="layui-row layui-col-space15">
<div class="layui-col-md3" th:each="student:${studentList}">
<div class="layui-card">
<div class="layui-card-header" th:text="#{page.title}">卡片面板</div>
<div class="layui-card-body">
<span>学号:</span> <span th:text="${student.id}"></span>
</div>
<div class="layui-card-body">
<span>姓名:</span> <span th:text="${student.name}"></span>
</div>
<div class="layui-card-body">
<span>年龄:</span> <span th:text="${student.age}"></span>
</div>
<div class="layui-card-body">
<span>性别:</span> <span th:text="${student.gender}"></span>
</div>
<div class="layui-card-body">
<span>生日:</span> <span th:text="${student.birthday}"></span>
</div>
<div class="layui-card-body">
<span>电话:</span> <span th:text="${student.phone}"></span>
</div>
<div class="layui-card-body">
<span>时间:</span> <span th:text="${#dates.format(student.today, 'yyyy-MM-dd HH:mm:ss')}"></span>
</div>
<div class="layui-card-body">
<span>分数:</span> <span th:text="${#numbers.formatDecimal(student.score, 5, 1)}"></span>
</div>
</div>
</div>
</div>
</div>
</body>
<script th:src="@{/layui/layui.js}" type="text/javascript"
charset="utf-8"></script>
</html>
|
3.浏览器中访问http://localhost:8080/index/showStudentListInfoByModel

10.在js里面取值
1.controller中添加方法
1
2
3
4
5
6
7
8
9
10
11
12
13
14
15
16
17
18
19
20
21
22
23
24
25
26
27
28
29
30
31
| package com.example.demo.controller;
import java.util.ArrayList;
import java.util.Date;
import org.springframework.stereotype.Controller;
import org.springframework.ui.Model;
import org.springframework.web.bind.annotation.RequestMapping;
import com.example.demo.vo.Student;
@Controller
@RequestMapping(value = "index")
public class IndexController {
@RequestMapping(value = "fetchValueInJs")
public String fetchValueInJs(Model model) {
Student student = new Student();
student.setId(50);
student.setName("Tom");
student.setGender("male");
student.setAge(15);
student.setBirthday(new Date());
student.setPhone("11122223333");
model.addAttribute("student", student);
return "fetchValueInJs";
}
}
|
2.新建fetchValueInJs.html,src/main/resources/templates/fetchValueInJs.html
1
2
3
4
5
6
7
8
9
10
11
12
13
14
15
16
17
| <!DOCTYPE html>
<html xmlns:th="http://www.thymeleaf.org">
<head>
<meta charset="UTF-8">
<title>Insert title here</title>
</head>
<body>
</body>
<script type="text/javascript">
let studentId = [[${student.id}]];
let studentName = "[[${student.name}]]";
alert("id:" + studentId + " " + "name:" + studentName);
</script>
</html>
|
3.在浏览器中访问http://localhost:8080/index/fetchValueInJs

11.信息源的带参数访问
1.在.properties中添加
2.在controller中添加方法
1
2
3
4
| @RequestMapping("sendParameter")
public String sendParameter() {
return "sendParameter";
}
|
3.新建sendParameter.html,src/main/resources/templates/sendParameter.html
1
2
3
4
5
6
7
8
9
10
11
| <!DOCTYPE html>
<html xmlns:th="http://www.thymeleaf.org">
<head>
<meta charset="UTF-8">
<title>Insert title here</title>
</head>
<body>
<div th:text="#{hobby('Jerry', 'reading')}"></div>
</body>
</html>
|

12.链接传值
1
2
3
4
5
6
7
8
9
| <h2>
<a href="/login/login?username=admin&password=123456">登录</a>
</h2>
<h2>
<a href="@{/login/login?username=admin&password=123456}">登录</a>
</h2>
<h2>
<a href="@{/login/login(username='admin',password='123456')}">登录</a>
</h2>
|
13.对象的读取
1.在controller中添加方法
1
2
3
4
5
6
7
8
9
10
11
12
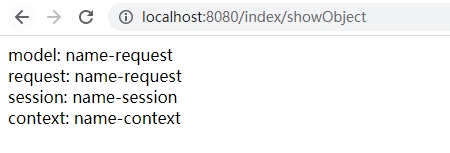
| @RequestMapping("showObject")
public String showObject(Model model, HttpServletRequest request) {
HttpSession session = request.getSession();
ServletContext context = request.getServletContext();
model.addAttribute("name", "name-model");
request.setAttribute("name", "name-request");
session.setAttribute("name", "name-session");
context.setAttribute("name", "name-context");
return "showObject";
}
|
2.新建showObject.html,src/main/resources/templates/showObject.html
1
2
3
4
5
6
7
8
9
10
11
12
13
14
15
16
17
18
19
| <!DOCTYPE html>
<html>
<head xmlns:th="http://www.thymeleaf.org">
<meta charset="UTF-8">
<title>Insert title here</title>
</head>
<body>
model: <span th:text="${name}"></span>
<br/>
request: <span th:text="${#httpServletRequest.getAttribute('name')}"></span>
<br/>
session: <span th:text="${#session.getAttribute('name')}"></span>
<br/>
context: <span th:text="${#servletContext.getAttribute('name')}"></span>
</body>
<br/>
</html>
|

model和request的作用域式相同的,model的优先级高于request
1
2
3
4
|
request.setAttribute("name", "name-request");
session.setAttribute("name", "name-session");
context.setAttribute("name", "name-context");
|
1
2
3
4
5
6
7
8
9
10
11
12
13
14
15
16
17
18
19
20
21
22
| <!DOCTYPE html>
<html>
<head xmlns:th="http://www.thymeleaf.org">
<meta charset="UTF-8">
<title>Insert title here</title>
</head>
<body>
model: <span th:text="${name}"></span>
<br/>
request: <span th:text="${#httpServletRequest.getAttribute('name')}"></span>
<br/>
session: <span th:text="${#session.getAttribute('name')}"></span>
<br/>
context: <span th:text="${#servletContext.getAttribute('name')}"></span>
</body>
<br/>
localCountry: <span th:text="${#locale.country} + '-' + ${#locale.displayCountry}"></span>
<br/>
localLanguage: <span th:text="${#locale.language} + '-' + ${#locale.displayLanguage}"></span>
</html>
|

14.修改默认templates路径
1.新建application.yml,src/main/resources/config/application.yml
1
2
3
4
5
| spring:
thymeleaf:
cache: false
prefix: classpath:templates/custom_templates/
|
2.在html中添加
1
| src/main/resources/custom_templates/showObject.html
|
3.浏览器中访问http://localhost:8082/index/showObject

15.项目目录结构
